The Best Chocolate Cake Ever!!!

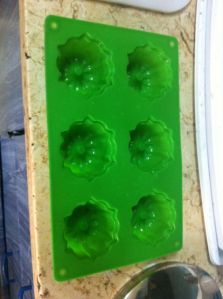
I have found this recipe online several times, often with the title “The Best Chocolate Cake Ever!!!”  And while it is a very good, very chocolatey chocolate cake, I don’t know if I could say it’s the best ever.  That is a very big claim.  But yesterday, after much pleading from Lulu and feeling like we all needed the mood boost a chocolate cake brings, I decided to bust out my new silicon cupcake pan.  I was hoping for cute little mini-bundt cake looking cupcakes.

IMG_0356

Bonus points because it’s green!

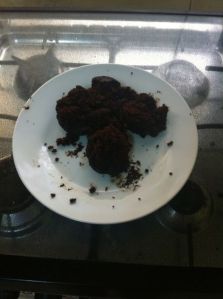
Instead, I got this:

IMG_0354

Now, it’s kind of hard to tell from this lousy photograph, but that is a clumpy pile of chocolate cakes that have none of the decorative grooves and whatnot I expected.  Which brings me to my problem with this cake: both times I have made it, it has refused to come out (the first time I used a metal cake pan).  No matter how good a cake tastes (and this one does taste very good), I cannot consider it “the best ever” it it sticks to the pan and breaks.  I’m a bit perplexed as to how to fix this…increase the baking temperature?  Cook it longer?  Maybe oil the pan instead of butter-and-flouring it?  If any of you baker pros out there have any tips, please leave them in the comments!

No matter how this cake looks, it does taste very good, and the recipe is a nice basic one to have on hand.  You could easily tweak it a little bit (like I did for Christmas, adding ground cardamom and orange zest) to add a flavor boost.  And, um, if it does happen to fall apart on you, just follow Lulu’s example:

IMG_0359Grab the biggest clump you can find and shove it in your mouth!

(Maybe) The Best Chocolate Cake Ever

1 cup flour
1 cup sugar
1/3 cup cocoa powder
1 tsp. baking powder
3/4 tsp. baking soda
1/2 tsp. salt
1/2 tsp. espresso powder (I used 1 tsp. instant coffee added to the boiling water)
1/2 cup milk
1/4 cup vegetable oil
1 egg
1 tsp. vanilla
1/2 cup boiling water

In a large bowl, mix the dry ingredients thoroughly.  (You can do this recipe by had with a whisk or with a hand mixer.)  Add the remaining ingredients except the boiling water and mix thoroughly.  Add the water (with the instant coffee if you’re using that) and mix as fast as possible for one minute.  Bake at 350 F for 30-35 minutes in a 9″ pan that has been greased and floured.

Sick Days

I meant to give you a new recipe today, for my current favorite cookies.  But I haven’t made them for a week or so, and since they don’t last more than a day or two after baking, I have no pictures for you.  Good incentive to make another batch, I guess!

But that will have to wait another day, as I am in bed trying to fight off some nose-throat-chest yuckiness that is passing through our family.  The combination of winter, a new country of new germs, and a daughter in preschool (which might as well be called “the little sickness factory”) has made these past few months seem like an endless onslaught of minor-but-frustrating colds and flu.

One of my favorite cold remedies is a hot cup of lemon juice, ginger and honey.  I make a big pot (I don’t have any measurements, just dump stuff in) and let it boil away for ten or fifteen minutes, and then drink from it throughout the day.  In the U.S. I use fresh ginger and strain it out, but here there is a powdered version available that works very nicely for beverages.  It’s different from the ground ginger available for cooking; it has larger granules and a stronger flavor.  Ginger drinks are very common and popular in the Middle East, especially in winter.  Adding hot milk to ginger and honey makes a thick, luxurious drink that warms you up from the inside out.

The hard thing about being sick (true for adults in almost any country) is that life does not stop.  I still had to take Lulu to preschool today–a 25 minute walk round trip.  I need to go to the market and get vegetables, or we’ll be eating plain noodles for supper.  I have to make lunch, and when Lulu gets home from preschool, feed and play with her.  Trying to rest is hard, when there is always so much that needs to get done!

Laundry Day!

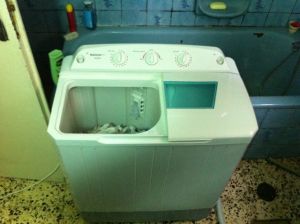
Semi-automatic Washing Machine

Semi-automatic Washing Machine

Today is a glorious sunny day, the kind where I see the weather forecast and think, “I need to get the laundry going!”  It is odd but true that in this desert city, winter is rather damp and frequently cloudy–weather not at all conducive to drying laundry on a clothesline.  But clotheslines are the norm here, and my four lengths of wire outside the kitchen window will hold just one small load of laundry.  I also have a drying rack in the living room, but it takes two or more days for things to dry inside the house.  I know of people who have electric clothes dryers, but they are very expensive and use a lot of electricity, and are mostly found in the villas and apartments of foreigners and the very wealthy.

Thankfully, washing machines are pretty common.  However, we–and most people of normal economic status–have what is called a “semi-automatic” or “half-automatic” washing machine.  Most Westerners have never heard or seen one of these, and I’ll admit that the first time I had to use one, I stared at the (Arabic) instructions for over half an hour before I started.  These washing machines are probably more appropriate for use in the Middle East than what I think of as a “normal” washing machine, as I think they use less water and electricity.  They also are portable, not requiring their own specific plumbing and electrical outlet (which would not be found in most apartments).

The process for washing laundry goes like this:

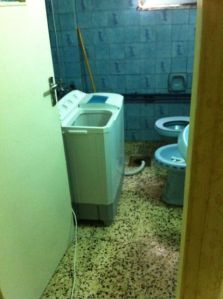
1. Move washing machine from the kitchen to the bathroom.  It is made of plastic and light enough that I can carry it on my own.  Plug it in to the electrical outlet in the hallway.

Washing machine in the bathroom.

Washing machine in the bathroom.

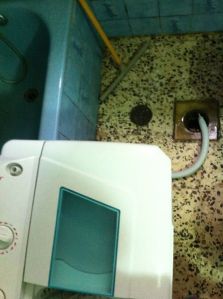
2. Hook up water hose to the bidet (Lulu calls it “the washing machine toilet”) and begin filling washing tub (the big one on the left) with water.  Add detergent and clothes; make sure not to overfill it.  It is better to err on the side of too little clothing, as these are not super powerful washing machines.  Put the washing machine drain hose into the bathroom floor drain.

Hooking up to the bidet.

Hooking up to the bidet.

Adding water.

Adding water.

3.  Turn off water, put on washing tub lid, and turn washing dial to desired washing time, usually 9-12 minutes.  (Make sure the setting dial is on “Normal.”)  Watch the magic begin!

(I had a video for you, but apparently have to upgrade my blog before I can share it.  Have to think about that…)

4.  When it finishes, turn the Settings dial to “Drain.”  All the water drains out of the washing tub.  At this point, the clothes are pretty twisted and tied up, so I try to untangle them.

Water going down the drain.

Water going down the drain.

5.  When it’s done draining, turn the Settings dial back to “Normal” and refill the washing tub with water.  Now we are doing the “rinse” cycle, which is basically a repeat of the “wash” cycle but without adding detergent.  Repeat steps #3 and #4.

6.  Now we move on to the “spin” cycle, the right hand tub of the machine.  This tub is much smaller than the washing tub, and can only hold a few items of clothing at a time.  If you overload it, it won’t work, or it will try to go and you’ll start to smell burning plastic.  The clothing in it also needs to be balanced weight-wise around the tub, or else when you turn it on it thumps and bumps and the washer jumps all around.  So, put the clothes in, make sure the Settings dial is still on Drain, and press the clothes down with the insert.  I guess this keeps them from flying around when they’re spinning?  Close the lids and turn the Spin dial; two minutes is usually sufficient for everything except jeans and towels, which need a minute extra.  For one load of wash, I usually end up with five or six loads of spinning.

7.  When you’re done spinning, unplug the washing machine and then gently tilt it in the direction of the drain hose to make sure all the water comes out.  Then pack it all up, move the washer back to the kitchen, and hang your clothes out on the clothesline.

The whole process takes a little bit over an hour, and is obviously more labor-intensive than just throwing things in a washing machine and moving them to the dryer.  Even with family of just three, I end up doing laundry four or five days a week since it’s not possible to wash much at once and I have to space things out to make sure they have time to dry.

Makarona bil-Bechamel

So, when I pulled up my schedule today, I realized that TUESDAY (not Wednesday, as I said in my previous blog post) is my blogging day.  Guess it’s going to take awhile to get used to this new routine!

Here is a recipe that I can’t believe I didn’t share earlier.  It was one of the first dishes I learned to make, from my Arabic teacher in Cairo.  It is also the first dish that ever earned me a true compliment, from an old, old woman who I visited with nearly every day.  Her only critique was that it needed more salt!  This is one of Hungry Husband’s favorite comfort foods, and in Cairo I would make it with camel meat, although ground beef is a fine substitute for those of you without a local camel market 😛

MAKARONA BIL-BECHAMEL (macaroni with bechamel sauce)

Ingredients:

For the meat filling:

1 large onion, diced

1 lb. ground beef

1 Tbsp. tomato paste

Spices of your choice (for the meat): cinnamon, whole cloves, cardamom pods, bay leaves, allspice

Salt and pepper

For the noodles:

13-16 oz. penne pasta (it doesn’t have to be precise, just whatever size the container is at your grocery store)

For the bechamel sauce:

1 stick of butter or ghee

1 cup flour

2 cups chicken brother

2 cups milk

2 eggs

salt to taste

Directions:

1.  Brown the meat with the onions, tomato paste and spices.  You can vary the amount and type of spices depending on how savory you like your meat.  My teacher cooked the meat in a small pot for a long time, so that eventually it reabsorbed all the fat that initially ran out.  It was very, very tasty, but you can drain the meat if you prefer.  When the meat is done, remove any whole spices you used.

Meat browning.

Meat browning.

2.  Cook the noodles to al dente.  Drain and rinse them so that they cool enough to handle and don’t stick together, then return to their pot.

3.  In a pot, melt the butter or ghee over low heat, then add the flour and whisk together.  Cook it over a low heat for several minutes–you should be able to smell the flour cooking.  It may start to brown, in which case take it off the heat so that it doesn’t burn.  Add the chicken broth and whisk vigorously–the flour and broth will seize up and turn very firm, but you can add the milk right in and keep whisking, and it should smooth out.  Cook it for two or three more minutes.  It should be about the consistency of pudding.  Turn the heat off and let it cool for a minute, then whisk in the two eggs.

4.  Pour half the bechamel sauce onto the noodles in their pot and mix together thoroughly.  Spread half the noodles into an oiled 9 x 13 casserole dish, then add the meat layer.  Spread the rest of the noodles on top of the meat and cover with the remaining bechamel sauce, using a spatula to smooth it down.

Layers.

Layers.

Lulu spreads the bechamel sauce over the top.

Lulu spreads the top layer of noodles.

5.  Cook in a 375 F oven for 50-60 minutes, until it is heated through and the top is golden brown and firm.  If you can, let it cool in the pan for 20 or 30 minutes before you cut it, as this will help the layers solidify an be more casserole-like.  We never manage to wait that long, so it tends to fall apart a little bit when I am serving.

Finished!

Finished!

Not ready to come out of the dish, but we're eating it anyway!

Not ready to come out of the dish, but we’re eating it anyway!